
EASY TO INSTALL
Browsers
Campaign Calendar has been tested on most major browsers.
- Chrome: Campaign Calendar has been tested on the most recent stable version.
- Safari: Campaign Calendar has been tested on the most recent stable version.
- Internet Explorer: Campaign Calendar has been tested on IE 11. Campaign Calendar is not supported on earlier versions of Internet Explorer where users may experience reduced performance.
- Firefox: Campaign Calendar has been tested on the most recent stable version.
Installation Considerations
Campaign Calendar is compatible with Salesforce Professional, Enterprise and Unlimited Editions.
- Footprint - Campaign Calendar will install custom objects, custom settings, and a Visualforce tab. Campaign Calendar is a managed package app and therefore in most cases these tabs and objects will not count against your quota with Salesforce.
- Chatter - Campaign Calendar suggests but does not require Chatter to be enabled.
Pre-Installation
To maximize the collaboration functions of this application, Campaign Calendar uses salesforce.com's Chatter functionality. To learn more about Chatter, visit http://www.salesforce.com/chatter.
Optional: Enable Chatter
Campaign Calendar does not require Chatter to be enabled, and if your organization does not use Chatter you can still install and use Campaign Calendar.
- From Setup, navigate to:
- Lightning: Feature Settings | Chatter | Chatter Settings.
- Classic: Customize | Chatter | Settings.
- Click Edit.
- Under Chatter Settings, select the Enable checkbox.
- Click Save.
Optional: Enable Campaign Feed Tracking
If Chatter is enabled and you want to see the Chatter tab on Campaign Details in the app, you would need to enable Feed Tracking for the Campaign object. Optionally, you can also select certain fields to track changes on.
- From Setup, navigate to:
- Lightning: Feature Settings | Chatter | Feed Tracking.
- Classic: Customize | Chatter | Feed Tracking.
- Select Campaign object from the list.
- Check Enable Feed Tracking.
- Optional: Using the checkboxes, select the fields that you would like to track.
- Click Save.
Install Campaign Calendar
- In the AppExchange, navigate to the Campaign Calendar listing.
- Click Get It Now.
- If prompted, click Log in to the AppExchange.
- Choose Install in Production or Install in Sandbox.
- Review the terms and conditions and check the I have read and agree to the terms and conditions checkbox.
- Click Confirm and Install!
Post-Installation
The Campaign Calendar package includes two custom checkbox fields: Exclude from Month View and Exclude from Plan View. These checkboxes allow users to quickly exclude certain campaigns from displaying on the calendar view. Add this field to the Campaign page layouts to make the feature accessible.
- From Setup, navigate to:
- Lightning: Objects and Fields | Object Manager and click on Campaign.
- Classic: Customize | Campaigns | Page Layouts.
- Under Page Layouts, click Edit next to the Campaign layout.
- Drag the Exclude from Month View and Exclude from Plan View fields onto your page layout.
- Click Save.

Granting Permissions
Campaign Calendar access is managed by the Campaigns object as well as Campaign Calendar permission sets.
Campaign Object Access
Campaign Calendar requires at least Read access to the Campaigns object.
- Confirm user profile has access to Campaigns object. Permissions (including Read, Create, Edit, or Delete) can be granted by modifying the profile or by creating a custom permission set to extend access to the Campaigns object.
- For users that need Campaign edit permissions, confirm that the Marketing User checkbox is also checked on the user record.

Assign Permission Sets
- From Setup, navigate to Users | Permission Sets.
- Click on Campaign Calendar - Standard Access.
- Click Manage Assignments.
- Click Add Assignments.
- Select users.
- Click Assign.
- Click Done to confirm.


Grant App (Or Tab) Access
The designated Campaign Calendar users need to have access to the Campaign Calendar App (Tab). These instructions will vary depending on the Salesforce interface that you are using: Classic or Lightning.
Note: This applies to Enterprise and Performance Editions. However, Group and Professional Editions may skip to step 4 and optionally add the Campaign Calendar tab to an existing app.
Lightning
- From Setup, navigate to Apps | App Manager.
- Locate the Campaign Calendar Lightning App. Click on the Show More arrow for it and select Edit.
- Click on the Assign to User Profiles tab.
- Assign to User Profiles. From the Available Profiles list, select the Profiles that need access to the app and move them to the Selected Profiles section using the Add arrow.
- Click Save.
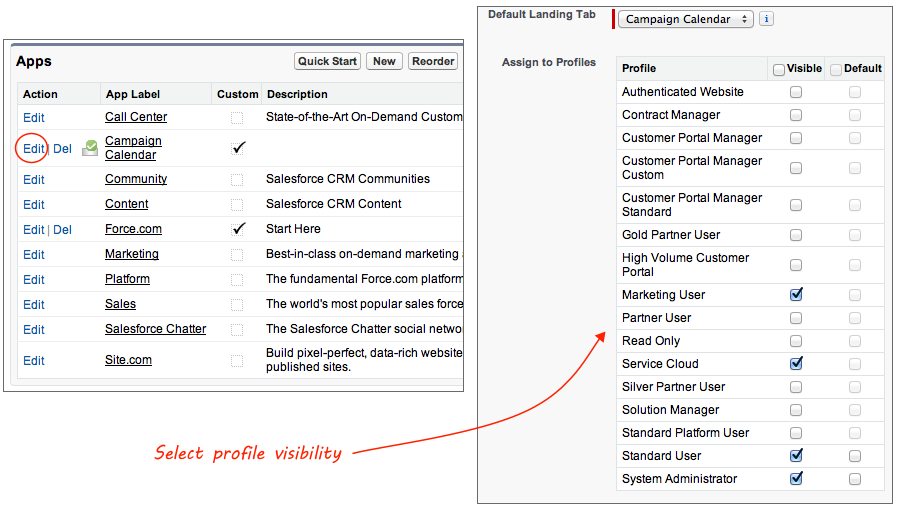
Classic
- From Setup, navigate to Create | Apps.
- Under Apps, click Edit next to Campaign Calendar.
- In the Assign to Profiles section, select the Visible checkbox for all applicable profiles.
- Click Save.
Congratulations! Campaign Calendar is ready to use.
Color Legend Permissions
It is possible to designate specific users to be Campaign Calendar super users using a supplemental permission set. These designated users will have the ability to manage the Company Color Settings, which allows them to change the color legend for different campaign types and update the color settings for all other users. Since the Company Color Settings are global, we recommend limiting this access to a few select marketing power users. Separately, each user will have the option to manage his or her own personal color settings.
- From Setup, navigate to Users | Permission Sets.
- Click on Campaign Calendar - Color Management.
- Click Manage Assignments.
- Click Add Assignments.
- Select users.
- Click Assign.
- Click Done to confirm.
Assign Licenses
After you purchase Campaign Calendar licenses, you will need to assign them to the designated users to give them access to the app.
Note: This step does not apply if you have purchased an org-wide license. Additionally, this step also does not apply if you are on the free trial. However,iIf you purchase individual licenses after the trial, you will need to assign them to designated users.
Keep in mind, if you ever need to transfer licenses between users, you can follow the same process to do so.
- From Setup, navigate to Installed Packages.
- Click on Manage Licenses next to Campaign Calendar.
- Click Add Users.
- Select users.
- Click Add.